100% Rye Sourdough Bread
Submitted by: Olga Bragstad
The healthy SD real rye bread with the rich flavor. Possible to start with minimum bread baking skills. No kneading, just stirring, no S&F. No tools exept the large spoon, bowl and bread tin. I shall bring you step by step through the method of my baking of this authentic, pure rye, that I have been developing and adjusting for 14 years.
You need just a good SD starter. And waht is interesting, it may be even just wheat starter! It will take three days of feeding it with wholemeal rye to get a good strong rye SD starter.
Ingredients
Rye active starter. May be built with wheat starter by means of feeding it with wholemeal rye for two three days.
Rye flour – wholemeal, coarse for preferment and mix of coarse and fine milled for the dough.
malt syrup for the preferment
dark molasses for the dough.
fresh brewed espresso for the dough
milk kefir for the dough
olive oil . Or another oil.
seeds: caraway seeds or coriander, flax seeds, sesame seeds.
Process
This is the recipe I have placed in the files of the group in 2018.
I have altered the recipe, turning it to more basic and easy to use. The options in ingredients, other than in the recipe, will be named at the end of the recipe.
The recipe looks like a long one, but this is only due to the details I cannot avoid, as the new rye bakers may need them. Actually they will need even more and finding everything in one place helps a lot.
So, here I will give not only the recipe and method . but shall include my tips, concerning rye.
Olga’s 100 % rye Sourdough dough bread.
What you need.
Warm place for the dough about 23C-25C!
Tools: bowl for the dough of circa 1 000 g., bread tin for the same amount of the dough, large spoon. Kitchen towel.
For the dough: wholemeal rye flour, better a coarse one. As option both coarse and fine milled.
Warm water , malt syrup. Salt , dark molasses, kefir. Seeds: flax seeds, sesame seeds, caraway whole seeds or instead coriander seeds (powdered and crashed).
Step 1. Overnight preferment.
250g rye wholemeal (preferably coarse) flour.
150g active rye starter ( I feed mine at least two times ). See the picture of the rye active starter.
350 water , a little bit warmer that RT.
20 g malt syrup
Mix well, cover and let it ferment in the warm place for about 8+12 hrs, depending on the ambient T, activity of your starter.
Step 2. Dough.
Morning. Remove some preferment (20-30g) to the clean jar, to keep it as starter in the fridge for the further bakes. Feed it after you finish mixing your dough. Keep it on the counter to watch the way it develops. This is very convenient to be aware of when your dough is ready with its bulk and proofing. This is better than to watch the exact time, given in the recipe.
Mix the wet ingredients:
Add to the preferment 20g. dark treacle/ molasses, 50 g. milk kefir, 15g fresh brewed espresso, 10 g. olive oil ( or another oil of your choice )
Mix in the separate bowl the dry ingredients:
250g. wholemeal rye. You may use now fine milled rye, or mix of the coarse and fine milled rye. See pictures of different types of rye. ¤¤¤
20 g sesame seeds, 20 g flax seeds, 7-10 g caraway whole seeds ( or coriander seeds, crashed)
11 g salt.
¤¤¤
you may have choice here . Use in the dough either mix of the fine milled wholemeal rye and sifted rye ( you may call it white rye in your country) . or just sifted rye/white rye. But, them you need to add oat flakes to meet the hydration of the dough. Add about 20 g. and keep this idea in a case of the very wet dough. You can always add some oat flakes to adjust the wetness of the dough, as it depends as you know on the flour, and may vary when you use new bag or new producer.
You may add the optional ingredients, such as: 10g. buckwheat flakes , 20g raisins, or cranberries (cut them first), 40g. Crashed nuts- mix of the hazelnuts and almond nuts. Your bread will turn then to the nice dessert bread.
Mix the dry into the wet, stir very well with a spoon. It is wet dough!! The dough is ready for the bulk. See the picture.
Step 3. Bulk ferment .
Place the covered bowl in to the warm place (rye likes to be kept warm) for about 3hrs. to 4 hrs. This is bulk stage. The dough will look very airy and fluffy , and about 1,5 times more in the volume. See the picture.
Step 4. Final proofing.
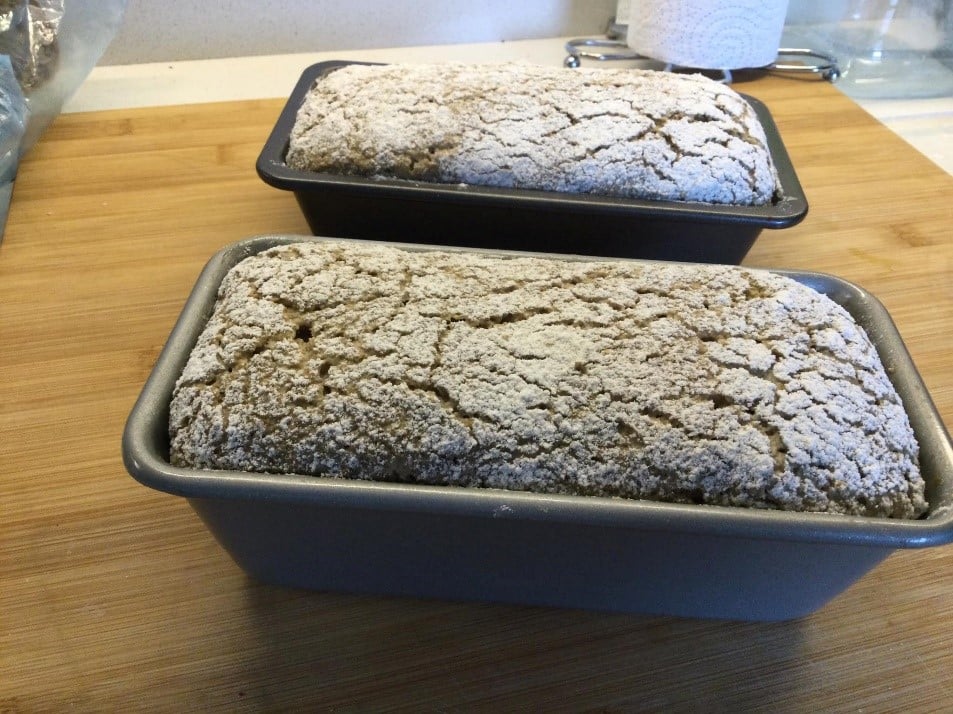
When your dough has puffed in the bowl it is time to place it in the bread forms and to proof you bread. I use 1,5 l. bread forms. Grease the bread tin well with cold butter. This works even with the old tins. Much better than oil, or melted butter. You may of course line the tin with baking paper, if you prefer, but cold butter is the easiest way.
How to transfer your dough in to the bread tin. You need just the same large spoon! Keep a small bowl with warm water at hand, to wet your spoon often, while transferring your dough into the bread tin. Do not spare water, it is all right if this process gives some more water to the dough with your wet spoon. Press lightly, form a kind of small smooth dome with the wet spoon. Cover with the cling film ( brush it with oil from the side facing dough, not to ruin the top of the dough if it rises very much). You may use a big plastic bag over your bread form, giving space for the raise of the dough. ¤¤¤
Proofing stage takes about 2 hrs. in the same warm place. But, watch your fed starter in the jar, that you have left on the counter. It gives more reliable information about the process. Switch on your oven.
When ready , you will see many small holes on the surface, confirming that the bread is well proofed.
Now you may brush it with the starch water, or flour water, cooked till it thickens, but, use thin layer of it with brush and do not let it drop on the bread tin sides. It will give a shiny surface. And top with seeds of your choice. Sometimes I decorate it with stencils, or create patterns with different kind of seeds. And I prick it then with wet wooden or plastic toothpick.
¤¤¤. About the topping of the dough. You may choose another classic look of the rye bread. Not the shiny crust, but dusted with flour. This should be done in advance, not right before baking. You dust the surface of the dough after you place it into the tin and let it proof. After fully proofed the surface will get very nice cracked pattern. You will be able still to see small holes in the places where floured surface is cracked. And I prick it then in the cracked areas with wet wooden or plastic toothpick . But, this method works better when bread is baked in the preheated oven and less steam.
Step 4. Baking
Here you may have two options, that depend on the final proofing.
Option 1– preheat your oven to 200C and start baking at this T. reducing it to 180 C after the first 20 min baking with steam. And continue till the bread is ready. Inner should be T 96C. this option is good if you start baking after your dough has been fully proofed, and raised over the bread tin.
Baking time will be circa 40-45 min.
Option 2. Start baking form the cold oven or from 50C. with steam. Put the oven to 200 C after bread is in the oven and continue baking for 25 -30 min . after 30 min, steam out, T reduced to 180 C and baking continues. This option is good for the slow dough , that hardly reaches the level of the bread tin edges. And may speed it up to finish fermentation in the oven.
Baking time will be circa 50-60 min.
If the bread is browning too quickly, shelter it with aluminum foil .
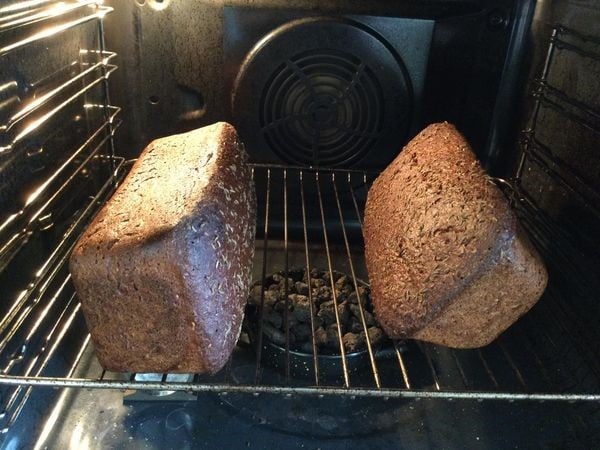
After the inner T is 96 C remove the bread form the bread tin and return it to the oven, placing it on the side, to prevent burning the top.
Step 5. Yes, we have one more step here! The rye bread needs time to be really ripe and ready. And it continues its magic for 24 hrs or more. So, right after it is ready it needs to be warm wrapped and covered to keep its warmth as long as possible.
Only after this it will reward you with its real flavor. See pic.
Tips to the 100% rye SD baking.
For rye lovers, if I may say so:)
My regular 100% rye bread.
For those who are interested in rye , some tips may be useful.
The flour and the T play big roles .
The Themperature: Rye loves to be warm:). Do not use your experience with white bread to retard. It is meaningless.
The flour: I always have good crumb with wholemeal coarse or very coarse rye flour. It is possible to mix it with about 20-30% fine milled wholemeal rye, but not more. If more, the crumb turns very dence. And it is necessary to use a bit less water. Different countries, different flour. Look for the really coarse. Try it and you will see the difference.
Fermentation : good to use the transparent bowle , as you are supposed to look for the bubbling surface only in the preferment, but not for bubbles at the sides of the surface in the bulk ferment. But, you will see through the transparent sides of the bowls the way rye ferments, turning from gluey mass to airy mass.
When bulk ferment is ready, you need just spoon to transfer your dough to the breadtin . Oil tin well . Wet the spoon often while transferring the dough. Fill the 2/3 of the breadtin. Smooth the surface with wet spoon , cover with showercap and let it proof in really warm place – about 26C. The bread will rise and you will see small tiny holes on the surface . This means it is ready for baking.
Gallery